Introduction to Performance Testing with k6
Simulating your MVP's combat readiness

Talks about artificial intelligence, building SaaS solutions, product management, personal finance, freelancing, business, system design, programming and tech career tips
🔱 Real World Scenario
Let's consider you are a stealth mode entrepreneur😎 who is striving (alone or with a few of your co-founders) to translate a fantastic automation🤖 idea into an MVP that you can ship📦 to potential clients as quickly as possible.
You prototyped it by🏗️ crafting a web application using Streamlit, built APIs using FastAPI, used a simple database🗄️like Deta, containerized🚢 your application with Docker and deployed🖧 it! Congratulations 🚀🚀. You have reached the milestone🪨 signifies half the journey to earning your first few bucks as a product owner.
Now, you prepare to step into the real world to get clients. Often you might have to offer trial runs before getting customers. Usually, this part requires more brainstorming🧠 than the coding itself although you might be just switching between your browser🌐 tab for social media, communication channels like slack/discord and a whiteboard where to strategize and perform📈 market analysis.
After spending several long hours🕛, crafting✏️ and executing🪛 advertising strategies, getting promotions done, etc to reach out to your potential clients👤, there comes a moment when you cracked a #viral strategy🔥🔥 that precipitates footfall in 100s or 1000s of users for a short period 😌.
At this stage, if your potential clients start complaining😠 that your application is not loading or is broken and you realize😥 that your product or it's component(s) is unable to handle multiple concurrent users🌊 although the core code itself works fine. This situation could have been avoided if you could have tested the robustness of your application⚔️ during the market analysis/advertising phase and anticipated🤔 such potential breakdowns. But now you have to restart on customer acquisition 😿, since your first client-product interaction was a dead end💀.
To prepare for situations like these, one should have a performance testing phase in their development pipeline.
🔱 What is performance testing?
Performance testing, a flavor of software testing, enables developers to assess how well a system or application performs under typical and projected peak load conditions. It can be used to assess the system's performance, including speed, reaction time, stability, and scalability, as well as to spot any potential performance bottlenecks.
It is a crucial part of the software development life cycle for organizations of various sizes as it helps organizations ensure that their systems and applications are dependable and scalable. It is typically performed near the end of the testing process, following the completion of functional and regression testing.
Performance Testing can be further classified into subtypes such as Load testing, stress testing, spike testing, volume testing, soak testing, and peak load testing. Each of these have distinct characteristics and is used to evaluate various aspects of a system's performance.
Typically, performance testing is carried out utilizing specialized tools and frameworks. These technologies imitate real-world user actions and let organizations customize the load, duration, and other test factors.
Some of the popular tools are JMeter, Locust, Gatling, Fiddler, Grating, Fiddler,nGrinder.
🔱 Getting Ready for implementation
"Talk is cheap. Show me the code" - Linus Torvalds
As developer-first entrepreneurs, we are the embodiment of the above quote. So, I shall teach you about the various performance tests by getting your hands dirty with code using k6
Why k6?
Open-source 🫶 - K6 is free to use and maintained by developer community across the globe who are constantly working to make a better experience for end users like us.
Easy 🥹 - K6 has a simple, intuitive interface combined with an intuitive syntax structure in JavaScript (⚙️Behind the scenes it uses low-level languages like Go). No need to play around with fat YAML files or long CLI commands
Scalable 💪 - K6 supports distributed testing and can run on multiple machines to simulate high levels of concurrency. This comes in handy when your tech product is gaining a large user base over the months and you don't wish to overcomplicate your pipeline while ensuring its robustness.
Cloud-based ☁️- K6 provides a service that enables users to conduct performance testing on a cloud-based infrastructure. This is a huge benefit for entrepreneurs who often lack the infrastructure to conduct such large performance tests in-house.
📥Installation
Linux (Debian Based)
  sudo gpg --no-default-keyring --keyring /usr/share/keyrings/k6-archive-keyring.gpg --keyserver hkp://keyserver.ubuntu.com:80 --recv-keys C5AD17C747E3415A3642D57D77C6C491D6AC1D69
  echo "deb [signed-by=/usr/share/keyrings/k6-archive-keyring.gpg] https://dl.k6.io/deb stable main" | sudo tee /etc/apt/sources.list.d/k6.list
  sudo apt-get update
  sudo apt-get install k6
Mac
brew install k6Windows
Make sure you have Chocolately package manager installed
Open Powershell as Administrator
choco install k6
🧪Test your installation
- Open a terminal and write k6

If you face errors at this step, check out the official k6 Troubleshooting guide
🔱 Crafting your performance tests
For this blog, I would be using a simple QR code generator application created using streamlit
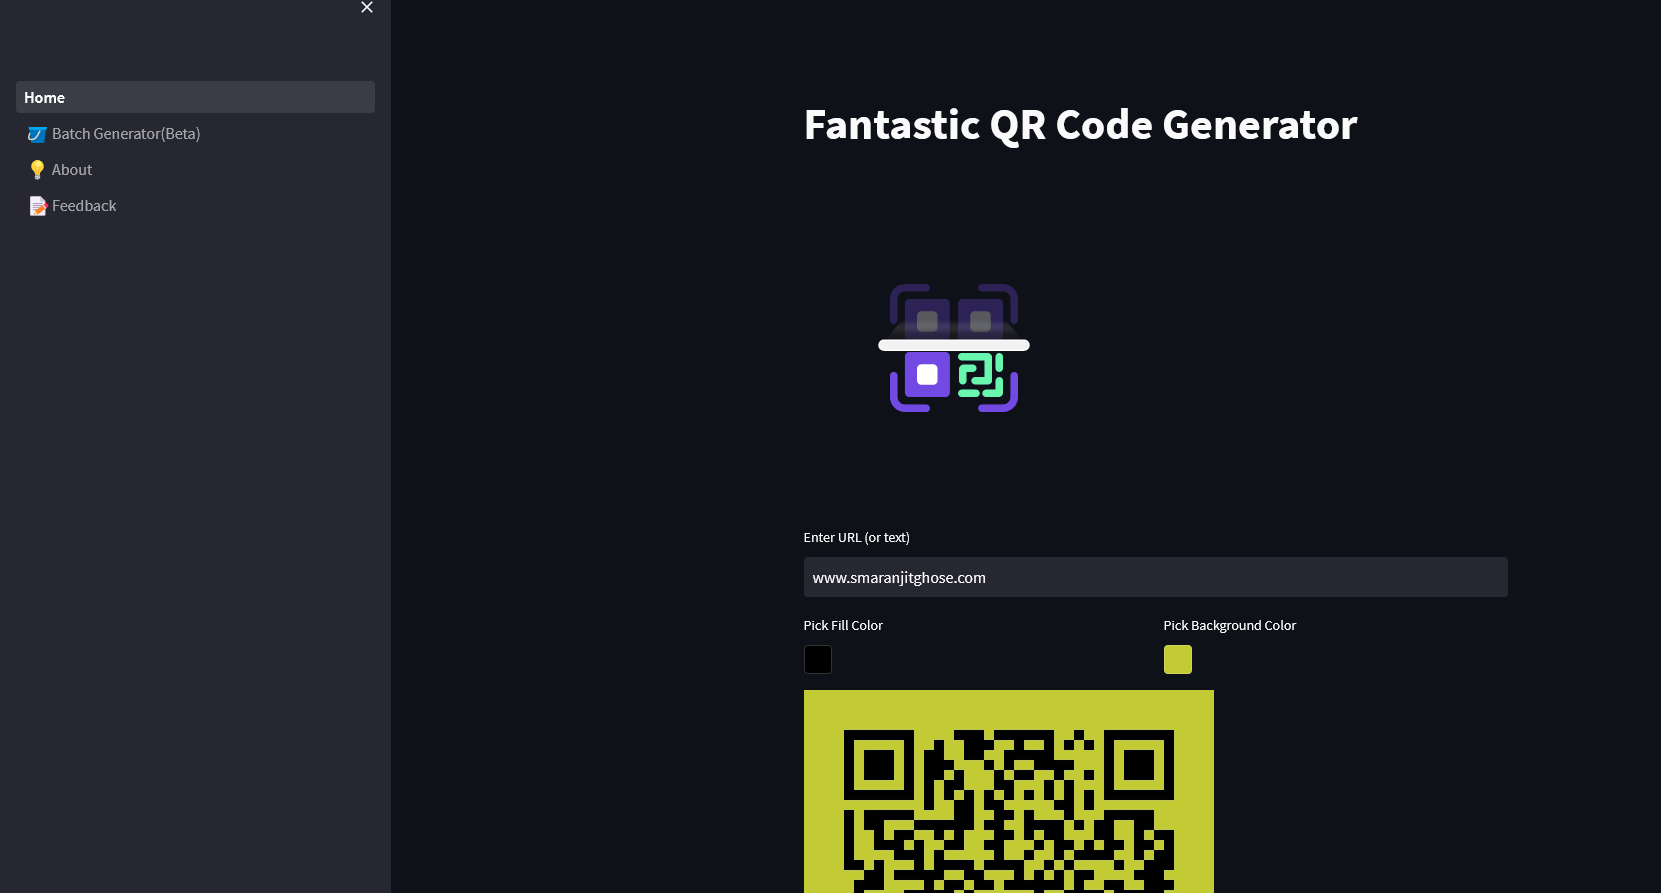
Check out the setup instructions from the [README](https://github.com/smaranjitghose/FantasticQRCode)
Core Application Code
  import streamlit as st
  from streamlit_lottie import st_lottie

  from utils import *

  import pandas as pd
  import numpy as np
  from PIL import Image
  import qrcode
  from qrcode.image.styledpil import StyledPilImage
  from qrcode.image.styles.colormasks import HorizontalGradiantColorMask

  def main():
      """
      Main Function for the streamlit App
      """
      st.set_page_config(
          page_icon="🤳",
          page_title = "Fantastic QR Code Gen",
          layout="centered",
          initial_sidebar_state="expanded",
          menu_items={
          'Get Help': 'https://github.com/smaranjitghose/fantasticqrcode',
          'Report a bug': "https://github.com/smaranjitghose/fantasticqrcode/issues",
          'About': "## A minimalistic application to generate QR Codes using python"
          }
      )
      st.title("Fantastic QR Code Generator")
      hide_footer()
      # Load and display animation
      anim = lottie_local("assets/animations/scanner.json")
      st_lottie(anim,
              speed=2,
              reverse=False,
              loop=True,
              quality="medium", # low; medium ; high
              # renderer="svg", # canvas
              height=300,
              width=300,
              key=None,
              )
      # Data Input
      data_in = st.text_input(label="Enter URL (or text)")
      # Parameters to Modify the QR Code
      col1, col2 = st.columns(2)
      with col1:
          fill_color = st.color_picker('Pick Fill Color', '#000000')
      with col2:
          back_color = st.color_picker('Pick Background Color', '#ffffff')

      # Create a QRCode object
      qr = qrcode.QRCode(version=4,
          box_size=10,
          border=4)
      # Pass the input data to the object and generate the output
      qr.add_data(data_in)
      qr.make(fit=True)
      # Covert the QRCode to an image with desired features
      img = qr.make_image(fill_color=fill_color, back_color=back_color)
      # Save the rendered QRCode image to assets sub-directory
      img.save("./assets/qrcode.png")

      # Read the Generated QR Code Image
      with open('./assets/qrcode.png', "rb") as file:
          # Display QR Code Image
          image = Image.open(file)
          st.image(image,caption="Result")
          # Download Button
          btn = st.download_button(
                  label="Download image",
                  data=file,
                  file_name="fantasticqrcode.png",
                  mime="image/png"
              )

  if __name__ == "__main__":
      main()
Use the above with the utils and other associate files in the repo to run successfully
Open the terminal and run the streamlit application
streamlit run ./Home.py
Your First Performance Test
Create a new terminal instance
Make a sub-directory for your test scripts
mkdir testsCreate a new test file
touch test/sample_test.jsOpen your desired IDE (say VSCode)
code .Paste the following code
  import http from 'k6/http';
  import { sleep } from 'k6';

  export let options = {
    vus: 1,
    duration: '20s',
    insecureSkipTLSVerify: true,
    noConnectionReuse:false
  };

  export default () => {
      http.get('http://localhost:8501');
      sleep(2);
    }
Understanding the Code
Import
httpandsleepfromk6moduleoptionshold all the parameters for performing the test itselfvus- the number of virtual users who run the test script; essentially parallelwhile(true)loopsduration- the time in seconds for which each user runs the test script
default- This function defines the entry point for all virtual users; what requests should the virtual users perform and to which end points?http.get('http://localhost:8051')- Send GET requests over HTTP to the port 8501 port of our local host where our streamlit application is running
Run the test script using k6 on the terminal
k6 run tests/sample_test.jsResult

We can observe from the snapshot above that k6 gives us a summary of the entire testing phase with concise performance metrics such as:
http_req_duration - the end-to-end time of all requests (that is, the total latency)
http_req_failed - the total number of failed requests
http_reqs - total number HTTP requests generated by k6
vus - Current number of active virtual users
vus_max - Max possible number of virtual users
iterations - the aggregate number of times the virtual users executed the test script
iteration_duration - the time it took to complete one full iteration, including time spent in setup and teardown
the
httpmodule supports all the common HTTP requests such asget()
put()
delete()
post()
head()
We can also test multiple endpoints (of an API) simultaneously by sending batch requests
  import http from 'k6/http';
  import { sleep } from 'k6';

  export let options = {
    vus: 1,
    duration: '20s',
    insecureSkipTLSVerify: true,
    noConnectionReuse:false
  };

  const BASE_API_URL = "https://localhost:5000"

  export default () => {
      http.batch(
      ['GET': `$BASE_API_URL/modelOptions`],
      ['': `$BASE_API_URL/modelOptions`],
      ['GET': `$BASE_API_URL/modelOptions`],
      );
      sleep(2);
    }
Load Test
Load Tests enable us to determine the performance of our application under typical and peak load conditions.
Very useful to compare the change in performance of our application between commits/changes in code bases over different versions.
Serves as a precursor to determining the peak load capacity of the application for writing stress and spike tests.
Create a new file for the load test
touch tests/load_test.jsPaste the following code
  import http from 'k6/http';
  import { sleep } from 'k6';

  export let options = {
      insecureSkipTLSVerify: true,
      noConnectionReuse:false,
      stages: [
          {duration: '5m', target: 100},
          {duration: '10m', target: 100},
          {duration: '5m', target: 0},
      ]

  };

  export default () => {
      http.get('http://localhost:8501');
      sleep(2);
    }
Understanding the code
The majority of the script is the same as the `
sample_test.js` script aboveNow, we introduce
stages, which simply implies a sequence of steps in each of atargetnumber of virtual users would send the requests to the application over a specifieddurationStages for the current load stage
Ramp up from 1 to 100 virtual users sending requests to the application over 5 minutes
Stay at 100 virtual users sending requests to the application over additional 10 minutes
Ramp down to 0 virtual users sending requests to the application over the next 5 minutes
Run the load test script using k6 on the terminal
k6 run tests/load_test.jsResult
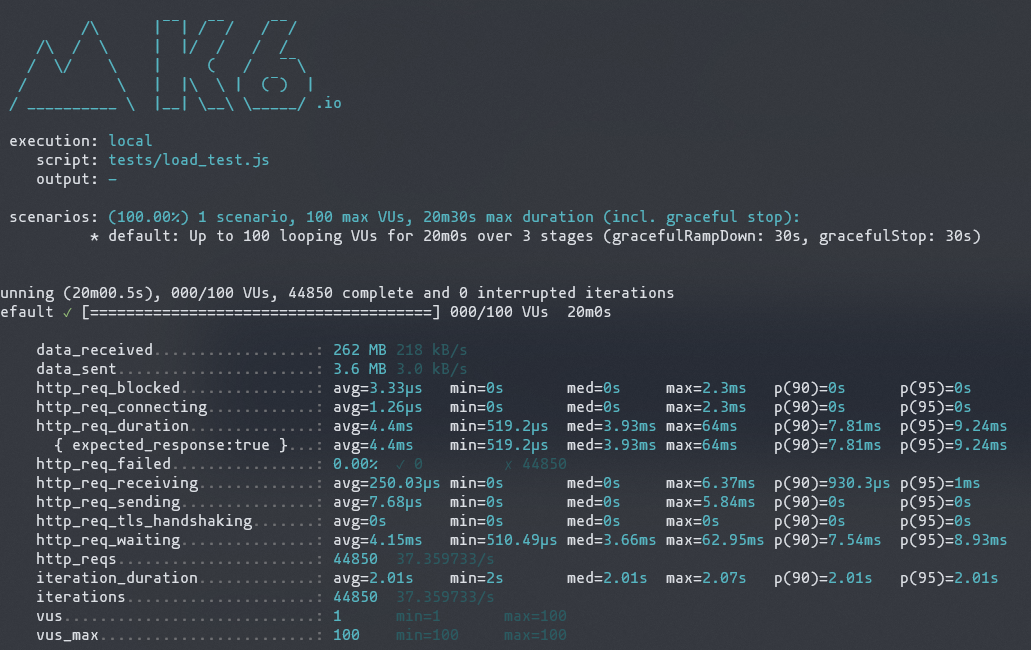
Hurray🎉🎉Our streamlit application successfully passed the load test as we can observe from the above snapshot 📸 that the percentage of
http_req_failedis 0.
Stress Test
Stress Tests enable us to determine the limitations of our applications.
They are helpful for us to:
understand the reliability and stability of the application under extreme situations
estimate the maximum capacity of the application in terms of the number of users/throughput
determine the breaking point of the application along with its mode of failure
inspect if the application would recover without manual intervention after the test is complete
Create a new file for the stress test
touch tests/stress_test.jsPaste the following code
  import http from 'k6/http';
  import { sleep } from 'k6';

  export let options = {
      insecureSkipTLSVerify: true,
      noConnectionReuse:false,
      stages: [
          {duration: '2m', target: 100}, //below normal load
          {duration: '5m', target: 100},
          {duration: '2m', target: 200}, // normal load
          {duration: '5m', target: 200},
          {duration: '2m', target: 300}, // around expected breaking point
          {duration: '5m', target: 300},
          {duration: '2m', target: 400}, // beyond expected breaking point
          {duration: '5m', target: 400},
          {duration: '10m', target: 0}, // scale down. Attempt Recovery
      ]

  };

  export default () => {
      http.get('http://localhost:8501');
      sleep(2);
    }
Understanding the code
The fundamentals of the code are the same as the previous load test except we modify the stages as follows
Below Normal Load Capacity - 100 virtual users send requests to the application over the first 2 minutes
Remain at Below Normal Load Capacity - The application keeps receiving requests from 100 virtual users for additional 5 minutes
Normal Load Capacity - 200 virtual users send requests to the application over the next 2 minutes
Remain at Normal Load Capacity - The application keeps receiving requests from 200 virtual users for additional 5 minutes
Expected Breaking Point - 300 virtual users send requests to the application over the next 2 minutes
Remain at Expected Breaking Point -The application keeps receiving requests from 300 virtual users for additional 5 minutes
Beyond Expected Breaking Point - 400 virtual users send requests to the application over the next 2 minutes
Remain at Beyond Expected Breaking Point - The application keeps receiving requests from 400 virtual users for additional 5 minutes
Attempting Recovery - The number of users sending requests to the application is scaled down to 0 over the next 10 minutes
Run the test script using k6 on the terminal
k6 run tests/stress_test.jsResult

Hurray🎉🎉Our streamlit application successfully passed the stress test as we can observe from the above snapshot 📸 that the percentage of
http_req_failedis 0- NOTE 📌: This may not be the case if we are using a machine learning model on a system where inference time is in several tens of seconds or in minutes
Spike Test
Spike Tests enable us to determine the behavior of our application when it is subjected to a rapid, sustained increase in user traffic over a relatively short period of time.
The behavior of the application can be categorized in the following ways:
Excellent - no degradation observed in performance due to sudden surge in workload
Good - degradation in application response time due to sudden surge in workload but all requests are successfully handled without any errors
Poor - application crashes due to a sudden surge in workload but recovers after the excess traffic has subsided
Bad - application crashes due to a sudden surge in workload and does not recover after the excess traffic has subsided
Create a new file for the spike test
touch tests/spike_test.jsPaste the following code
  import http from 'k6/http';
  import { sleep } from 'k6';

  export let options = {
      insecureSkipTLSVerify: true,
      noConnectionReuse:false,
      stages: [
          {duration: '10s', target: 100}, //below normal load
          {duration: '1m', target: 100},
          {duration: '10s', target: 1200}, // spike to 1200 users
          {duration: '4m', target: 1200}, // stay at 1400 for 4 minutes
          {duration: '10s', target: 100}, // Scale down.  Attempt Recovery
          {duration: '3m', target: 100},
          {duration: '10s', target: 0},
      ]

  };

  export default () => {
      http.get('http://localhost:8501');
      sleep(2);
    }
Understanding the code
The fundamentals of the code are the same as the previous test except we modify the stages as follows
Below Normal Load Capacity - 100 virtual users send requests to the application over the first 10 seconds
Remain at Below Normal Load Capacity - The application keeps receiving requests from 100 virtual users for an additional 1 minute
Spike in Load Capacity **-**1200 virtual users send requests to the application over the next 10 seconds
Remain in Spiked Load Capacity - 1200 virtual users send requests to the application over the next 4 minutes
Scale down to Below Normal Load Capacity - 100 virtual users send requests to the application over the next 10 seconds
Remain at Below Normal Load Capacity - The application keeps receiving requests from 100 virtual users for an additional 3 minutes
Run the spike test script using k6 on the terminal
k6 run tests/spike_test.jsResult
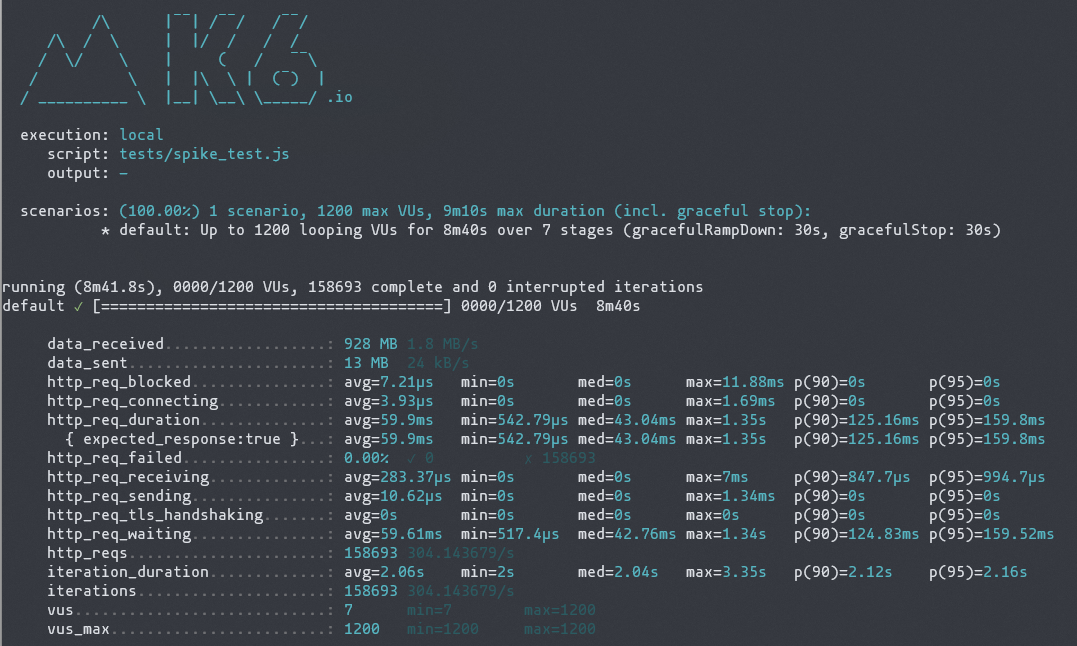
Hurray🎉🎉Our streamlit application successfully passed the spike test as we can observe from the above snapshot 📸 that the percentage of
http_req_failedis 0
Soak Test
Soak Tests enable us to determine the reliability of our system over a long time
They are helpful for us to:
inspect if external services on which our application depends do not stop working after a certain amount of requests are executed
supervise that our database does not exhaust the allocated storage and stops
review that our logs don't exhaust the allocated storage
probe for memory leaks or bugs which are caused due to a crash or restart
verify our application does not lose requests
find bugs due to race conditions that occur sporadically
For a basic soak test, we use 75%-80% of our peak load capacity
As you can infer, it is quite cumbersome to run these tests and perform corrections to the codebase if needed thereafter
Create a new file for the soak test
touch tests/soak_test.jsPaste the following code
  import http from 'k6/http';
  import { sleep } from 'k6';

  export let options = {
      insecureSkipTLSVerify: true,
      noConnectionReuse:false,
      stages: [
          {duration: '2m', target: 500},
          {duration: '4h30m', target: 500},
          {duration: '2m', target: 0},
      ]

  };

  export default () => {
      http.get('http://localhost:8501');
      sleep(2);
    }
Understanding the code
The fundamentals of the code are the same as the previous load test except we modify the stages as follows
Ramp up from 500 virtual users sending requests to the application over the first 2 minutes
Stay at 500 virtual users sending requests to the application over additional 4 hours and 30 minutes
Ramp down to 0 virtual users sending requests to the application over the last 2 minutes
Run the soak test script using k6 on the terminal (And go for a run in the park and some dinner afterwards!)
k6 run tests/soak_test.js🔱 Integration into CI/CD Pipeline
Although once one has created the first few iterations of your product, drafting the performance test scripts and running them locally on your web application/API is quite insightful, integrating the performance testing as a part of a minimal CI/CD pipeline is quintessential before moving towards deployment options.
GitHub Actions is the most convenient way to set up such a CI/CD pipeline for the product which ensures that a single platform is used for different types of checks and workflows before being pushed to production.
Furthermore, this enhances the collaboration efforts on bug fixing and feature addition/removal if one has multiple co-founders contributing the project, thereby facilitating effective feedback on code changes.
Creating your first CI/CD Workflow
Create a sub-directory for github configuration and corresponding GitHub Action Workflows
  mkdir .github
  mkdir .github/workflows
Create a YAML file for Performance Testing workflow
touch .github/workflows/perf_test.ymlOpen the YAML file in your IDE
code .github/workflows/performance_test.ymlPaste the following Code
  performance_test:
    name: Performance Test with K6
    runs-on: ubuntu-latest

  on:
   push:
      branches:
        - master
      branches-ignore:
          - docs
    pull_request:
      branches:
         - master
         - dev
      branches-ignore:
          - docs

  jobs:
    load_test:
      name: Loading Testing with k6
      runs-on: ubuntu-latest

      steps:
        - name: Checkout
          uses: actions/checkout@v1

        - name: Run k6 test
          uses: grafana/k6-action@v0.2.0
          with:
            filename: load_test.js
            flags: --out json=load_results.json

        - name: Upload Load test results
          uses: actions/upload-artifact@v3
          with:
            name: load-test-report
            path: load_results.json

    stress_test:
      name: Stress Testing with k6
      runs-on: ubuntu-latest

      steps:
        - name: Checkout
          uses: actions/checkout@v1

        - name: Run k6 test
          uses: grafana/k6-action@v0.2.0
          with:
            filename: tests/stress_test.js
            flags: --out json=stress_results.json

        - name: Upload Stress test results
          uses: actions/upload-artifact@v3
          with:
            name: stress-test-report
            path: stress_results.json

    spike_test:
      name: Spike Testing with k6
      runs-on: ubuntu-latest

      steps:
        - name: Checkout
          uses: actions/checkout@v1

        - name: Run k6 test
          uses: grafana/k6-action@v0.2.0
          with:
            filename: tests/spike_test.js
            flags: --out json=spike_results.json

        - name: Upload Spike test results
          uses: actions/upload-artifact@v3
          with:
            name: spike-test-report
            path: spike_results.json
Understanding the instructions:
Create a
performance_testworkflow which loads up an instance ofubuntu-lateston GitHub's Azure Serversondictates the events in the GitHub repository that trigger the workflow to be executedHere, we wish to trigger the workflow when a new change is
pushed to themasterbranch or a newpull_requestis raised for themasteranddevbranches while ignoring any changes for adocsbranchYou can further reduce unnecessary triggers by specifying changes to a set of files that shall trigger the workflow to execute
on: push: branches: - master paths: - '**.py' - 'pages/**.py'jobsindicate the different automation tasks that should be performed on the recently changed codebase to achieve the objective of the workflowHere, we desire to perform the following jobs"
load_testspike_testsurge_test
For each of the jobs, the following sequence of steps are perfomed:
Pull the changed code from the repository using GitHub's native action
actions/checkout@v1Use the official GitHub Action by k6
grafana/k6-action@v0.2.0to perform the performance test described in the file identified byfilenamewhile storing the output asjsonfileThe output is made available as an artifact from Azure Servers of GitHub to the UI of the Repository under Actions tab for detailed analysis
I recommend using Soak Test only on branches where one is not to make a change for at least a day.
Using different workflows for different tests to make them run parallely
🔱 Closing Remarks
I hope this short tutorial provided you with valuable insights to incorporate performance testing using k6 into your development lifecycle as a software developer or budding tech entrepreneur.
While testing you may notice, that your system's capabilities limit the number of virtual users you can have to a few thousand(s). This is sufficient for taking your product to market with little to no funding. Once you have some cashflow, utilize k6 cloud service to run the tests on tens of thousands or perhaps a million users as you continue to scale.
As I mentioned above, there is a plethora of tools available for the same purpose but from my experience (at the time of drafting this blog), k6 is the only one with the minimum learning barrier for anyone who does not wish to dive too deep into this aspect but wishes to make use of the feature of their product.
Thank you🙏🙏 for your time and attention.
If you have any queries, feel free to reach out👋over LinkedIN. I would love to know about your experience👩💻 of incorporating this in your projects/products.
Happy Building!🚀🚀